To assess dough in a proofer without opening it, look for visual cues like slight puffiness, surface tension, and a domed, airy appearance. Use viewing windows or transparent panels to check for bubbles and size changes. Pay attention to digital indicators, such as temperature and humidity displays, to guarantee ideal proofing conditions. Developing an eye for these signs helps you gauge readiness accurately. Keep exploring to discover more tips that can perfect your proofing process.
Key Takeaways
- Use the proofer’s transparent viewing window or panels to visually assess dough size and surface tension without opening.
- Rely on digital displays or sensors indicating dough volume, temperature, and humidity levels inside the appliance.
- Observe ambient indicators like illuminated panels or status lights that signal proofing stages.
- Develop experience-based judgment by correlating visual cues such as puffiness and surface gloss with proofing progress.
- Monitor consistent environmental conditions (temperature and humidity) through built-in controls to infer dough readiness.

Understanding how to read dough in a proofer is essential for achieving perfect bread every time. When you’re working with a dough proofer, the key is to monitor its progress without opening the door and disrupting the environment. The first thing you need to focus on is the temperature control. Most proofers are designed to keep the ideal temperature steady, usually between 75 and 85°F, because this range promotes ideal yeast activity. If the temperature rises too high or drops too low, your dough won’t proof properly. Many modern proofers come equipped with digital displays or remote sensors that let you check the temperature at a glance, so you don’t have to open the door and let out precious heat or humidity.
Monitor temperature closely with digital displays or sensors to ensure optimal dough proofing without disrupting the environment.
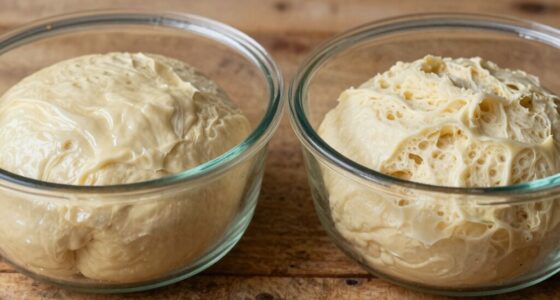
Humidity levels are equally important for reading dough’s progress accurately. Maintaining the right humidity—typically around 75%—keeps the dough moist and prevents it from drying out during proofing. When you’re observing the dough without opening the proofer, look for subtle cues such as slight puffiness and surface tension. If the dough appears overly sticky or wet, it might be underproofed or in need of more time. Conversely, if it looks dry or has a tight surface, it could be overproofed or ready to bake. Many proofers have humidity gauges or built-in humidification systems that you can check without disturbing the environment. Additionally, some proofers include visual indicators such as illuminated panels or color changes that signal different proofing stages.
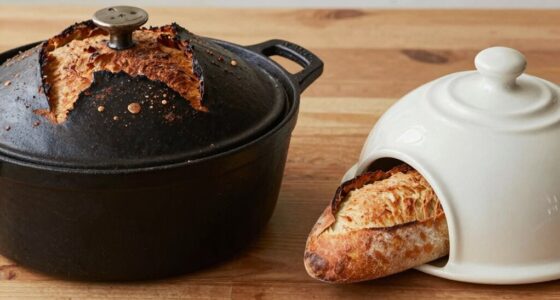
Some advanced proofers even offer humidity and temperature data logging, allowing you to track changes over time. This information helps you determine whether your dough is progressing as it should. When you’re not opening the door, you can also rely on visual cues through viewing windows or transparent panels. A well-proofed dough will have roughly doubled in size, with a slightly domed surface and a light, airy appearance. You’ll notice bubbles forming just beneath the surface, indicating active fermentation. Becoming familiar with these visual signs of proofing can help you judge the dough’s readiness more accurately. Additionally, understanding the typical proofing time for various dough types can further refine your process. The more experienced you become, the better you’ll be at recognizing these cues without relying solely on timers or digital readouts.
If your proofer lacks digital monitoring, you need to develop a sense of timing and visual cues based on your previous baking experiences. By paying close attention to the environment’s temperature control and humidity levels, and observing the dough’s appearance through the window, you can expertly gauge when it’s ready without disrupting its environment. This approach guarantees consistent results and saves you from over- or under-proofing, leading to bakery-quality bread every time.
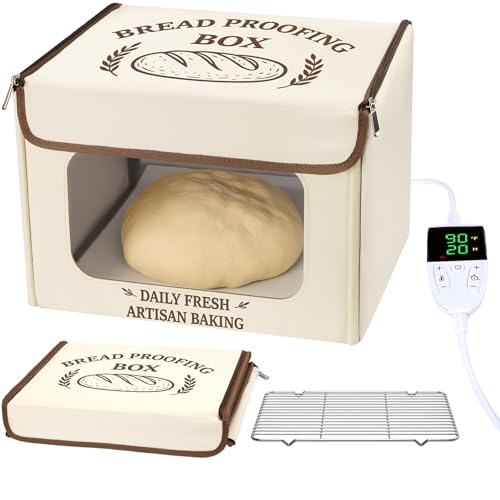
Antner Folding Bread Proofing Box with 70-131°F Temp Control & 99H Timer, Front-View Window Sourdough Proofing Box, Dough Proofer with Metal Rack for Sourdough, Pizza, Bread Baking, Yogurt, Kombucha
- Three-Zone Heating for Consistent Temperature: Maintains 70–131°F for perfect proofing
- 99-Hour Timer with Auto-Shutoff: Long-duration proofing with safety feature
- Front-View Window for Easy Monitoring: Check dough without opening the box
As an affiliate, we earn on qualifying purchases.
As an affiliate, we earn on qualifying purchases.
Frequently Asked Questions
What Are the Ideal Dough Temperature Ranges for Proofing?
The ideal dough temperature for proofing generally ranges between 75°F and 85°F. Maintaining this range promotes best dough fermentation and yeast activity, ensuring consistent rising. If the temperature is too low, fermentation slows down; too high, and yeast may overreact, affecting flavor and texture. Use a reliable thermometer to monitor your proofer’s temperature to keep your dough in the perfect zone without frequent openings.
How Do Humidity Levels Affect Dough Rising in a Proofer?
Have you ever wondered how humidity control impacts dough rising? Higher humidity levels help retain moisture, resulting in a softer dough with a better texture, while low humidity can cause dough to dry out and develop a dense texture. Proper humidity levels guarantee consistent proofing, prevent crust formation, and promote even fermentation. Adjusting humidity in your proofer is crucial for ideal dough texture and perfect rise every time.
Can Different Types of Dough Require Varying Proofing Times?
Yes, different types of dough require varying proofing times. Dough hydration levels and flour type play significant roles in this process. Higher hydration doughs often need more time to develop gluten, while whole grain flours may take longer to proof due to their density. You should monitor the dough’s appearance and texture rather than sticking to strict times, adjusting proofing duration based on these factors for best results.
How Often Should I Calibrate My Proofer for Accurate Readings?
You should calibrate your proofer at least once every three months to guarantee accurate readings, which is vital for consistent baking results. Regular calibration also promotes kitchen safety by preventing overproofing or underproofing dough. Incorporate equipment maintenance into your routine, checking temperature and humidity controls. By doing so, you keep your proofer functioning properly, reducing risks and maintaining ideal conditions for your baked goods.
What Signs Indicate Over-Proofed or Under-Proofed Dough?
If your dough is over-proofed, you’ll notice excessive yeast activity, causing it to rise too much and become very airy, with a fragile gluten development. Under-proofed dough, on the other hand, shows minimal rise, with dense texture and tight gluten structure. You can gently poke the dough—if it springs back quickly, it’s under-proofed; if it leaves an indentation, it’s over-proofed. Adjust proofing times accordingly for perfect results.

TempPro TempSwift 1 Sec Digital Food Thermometer for Kitchen Cooking
- Fast Readout: 1 second temperature measurement
- High Accuracy: +/-0.9°F precision
- Long Probe: 5.3-inch stainless steel probe
As an affiliate, we earn on qualifying purchases.
As an affiliate, we earn on qualifying purchases.
Conclusion
Now that you know how to read your dough without opening the proofer, imagine the perfect rise waiting just beyond your reach. But what if there’s more to discover—hidden signs that can tell you exactly when your dough is ready? Keep your eyes sharp, stay attentive, and trust your instincts. The secret to flawless baking isn’t just in the process but in knowing when to act. Are you ready to access that next level?

JEDEW 2 Pack Hygrometer Thermometer Digital Humidity Meter Indoor/Outdoor Humidity Monitor Reptile Thermo-Hygrometer for Greenhouse Humidors Terrarium Jars, Fahrenheit (℉) /Celsius(℃) (2)
- Wide Application Areas: Suitable for home, office, greenhouse, and more
- Quick Response Time: Measures every 10 seconds for accuracy
- Wide Measurement Range: Temperature: 0℃-70℃, Humidity: 10%-99% RH
As an affiliate, we earn on qualifying purchases.
As an affiliate, we earn on qualifying purchases.
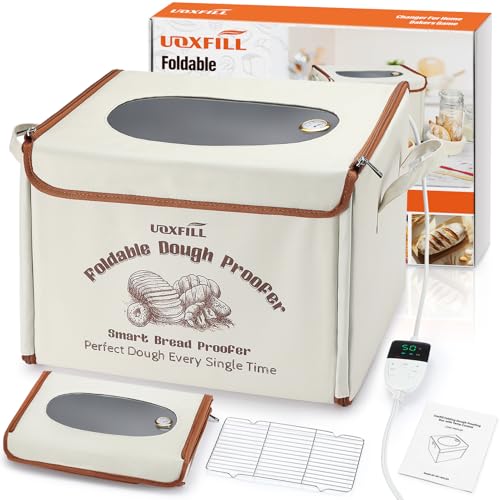
Folding Bread Proofing Box with Temp Control & 4H Auto Shut Off 48H Timer
- Fast & Even Heating: Three-zone heating with adjustable temperature
- Space-Saving Foldable Design: Compact and easy to store when not in use
- Superior Insulation: Multi-layer insulation for consistent temperature
As an affiliate, we earn on qualifying purchases.
As an affiliate, we earn on qualifying purchases.