
TL;DR
Acoustic dampening is about reducing reflections, not full soundproofing. Proper placement and sealing are crucial, and a closet can work well if you manage heat and sound leaks. The key is balancing absorption, isolation, and ventilation for best results.
Ever tried recording in a tiny, echo-y closet? It’s like singing inside a metal box—tinny, boxy, and full of unwanted reflections. But what if your cramped space could turn into a quiet, professional-sounding booth? That’s where smart placement, targeted dampening, and good ventilation come into play.
This article is your go-to guide for transforming a closet into a top-notch recording spot. Whether you’re battling echo, noise leaks, or heat buildup, I’ll show you practical, real-world solutions that work—without breaking the bank or ruining your room.
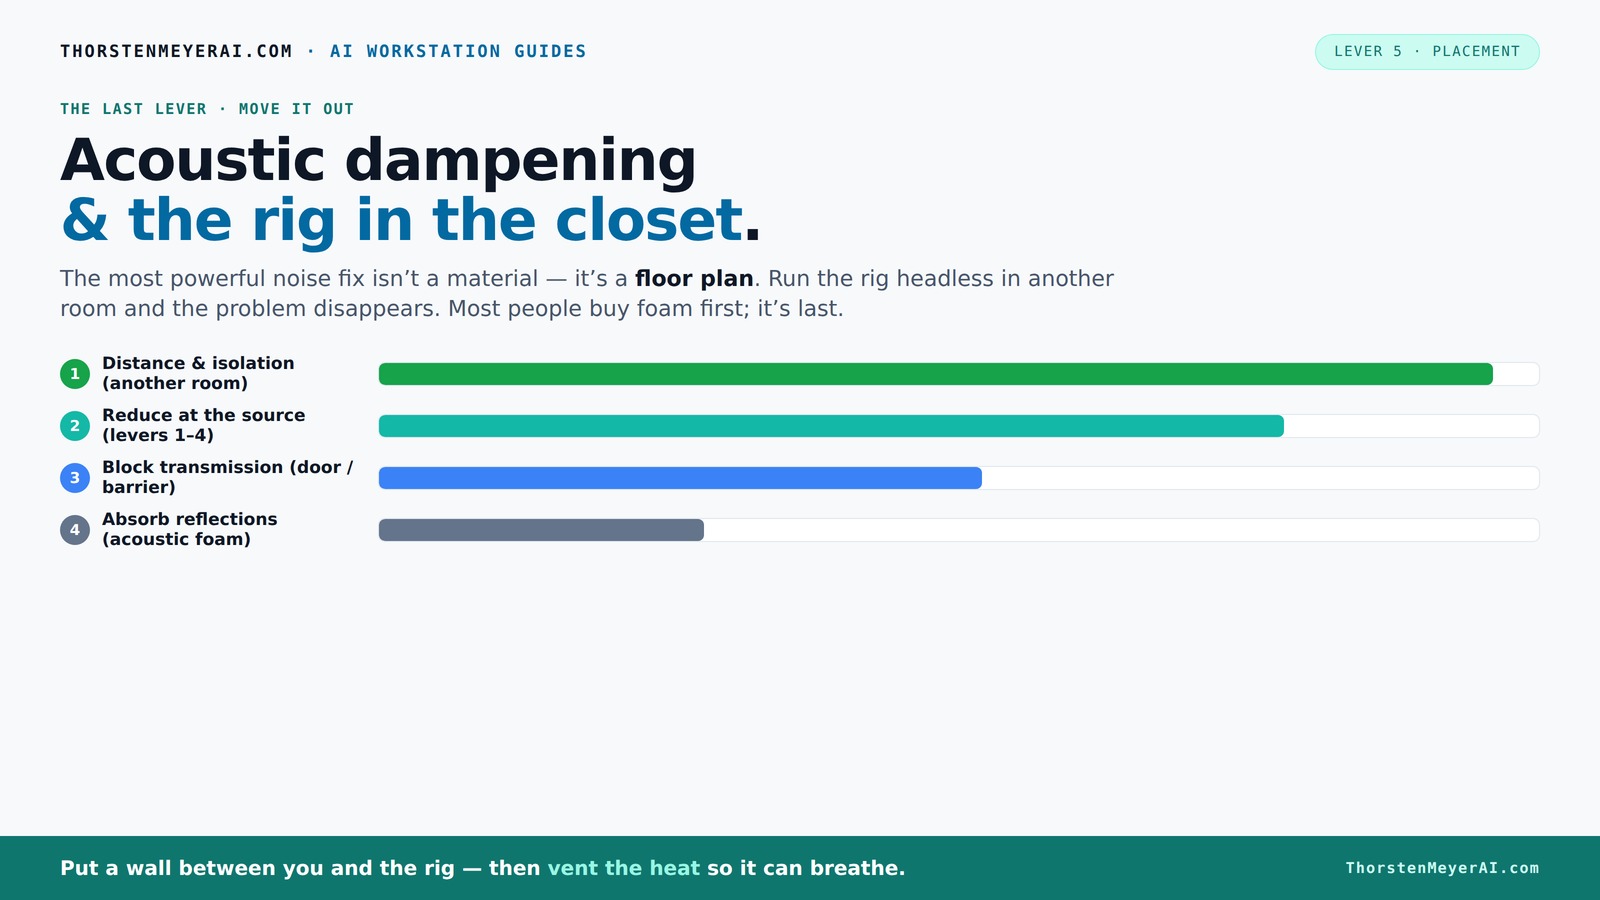
Acoustic dampening
& the rig in the closet.
The most powerful noise fix isn’t a material — it’s a floor plan. A rig you can’t hear because it’s in another room beats any amount of foam. Tap the approaches in Part 1 to see what actually works.
(another room)
(levers 1–4)
(door / barrier)
(acoustic foam)
Contain the noise, not the heat
Key Takeaways
- Always prioritize distance and isolation before adding foam or absorbent panels.
- Proper placement of acoustic treatment reduces echo and improves clarity significantly.
- Sealing gaps around doors and walls is critical to prevent sound leaks.
- In small spaces, a dynamic mic often outperforms condensers for reducing room noise.
- Ventilation is essential when placing high-heat rigs in closets—don’t trap the heat!

Focusound 52 Pack Acoustic Foam Panels 1" x 12" x 12" Sound Proof Foam Panles Soundproofing Noise Cancelling Wedge Panels for Home Office Recoding Studio with 300PCS Double-Side Adhesive
Soundproofing - Acoustic foam panels triangular grooves structure for better noise absorption, helps to reduce and absorb unwanted...
As an affiliate, we earn on qualifying purchases.
As an affiliate, we earn on qualifying purchases.
Why Acoustic Dampening Isn’t Just About Foam
Acoustic dampening is about controlling how sound bounces around your space, not stopping sound from escaping. Think of it like softening the echo in a canyon versus blocking a river from flowing out. Foam and panels absorb reflections, reducing that annoying "boxy" sound that small rooms amplify.
For example, placing foam panels behind your mic helps catch the first reflections, making your voice clearer. But if you want silence outside the room, you’ll need solid barriers and sealing techniques. Foam alone won’t stop your neighbors from hearing your singing or your loud PC.
Research from soundproofing experts shows that combining absorption with proper sealing cuts unwanted noise more effectively than foam alone [1]. The tradeoff here is that while foam reduces interior echo, it doesn’t provide much in the way of external soundproofing. Proper sealing and adding mass or barriers are necessary if your goal is to keep noise in or out. The implication is that relying solely on foam might give you a cleaner sound inside but won't prevent noise leaks, which could be problematic if you need privacy or neighbor peace.

Audimute Soundproofing Acoustic Door Seal Kit - Door Sweep and Seal - (Standard Size)
Includes a Door Seal (3/16" x 1/2" x 25') and a Door Sweep (1/2" x 1.5" x 4').
As an affiliate, we earn on qualifying purchases.
As an affiliate, we earn on qualifying purchases.
Placement Secrets: Where to Put Acoustic Treatment for Best Results
The key to a good closet voice booth is smart placement of your acoustic materials. Start with the mic position—place it where your voice naturally hits best, usually a few inches off the wall. Then, treat the surfaces where sound reflects back into the mic.
Think of your room like a mirror maze. Focus on the "reflection points": the wall directly behind the mic, the ceiling, and the corners. Dense panels or foam here will dramatically reduce echo and standing waves. Proper placement is crucial because it targets the specific areas where sound bounces and creates muddiness or echo. If you neglect these spots, you'll end up with recordings that sound distant or hollow, regardless of other treatments.
For example, a DIY setup might include foam panels on the wall behind your mic, plus some in the corners to trap low frequencies. Use a mirror or a simple flashlight trick to find those reflection points easily. The tradeoff is that improper placement can lead to uneven sound absorption, where some reflections persist, affecting clarity. Properly identifying and treating these points ensures a more balanced and natural sound, avoiding the mistake of scattering foam randomly which can be ineffective or even worsen sound if misapplied.

VEVOR Portable Vocal Booth, 6.56 ft Height, Portable Recording Studio with Travel Bag, Mobile Tablet Stand, Thickened Soundproofing, Sound Isolation Booth for Echo-Free Vocals, Podcasts, Voiceovers
Say Goodbye to Echoes: Built with durable Oxford cloth and acoustic padding, this recording booth for the home...
As an affiliate, we earn on qualifying purchases.
As an affiliate, we earn on qualifying purchases.
The 'Rig in the Closet' Setup — How to Keep Cool and Quiet
Putting your high-powered rig inside a closet is a smart move for noise reduction. But heat buildup is the biggest challenge. A sealed closet traps heat, and without proper airflow, your machine can overheat, throttling performance and causing fans to scream.
To prevent that, you need active ventilation: a quiet exhaust fan, passive vents, or ducting that moves hot air out and pulls in cooler air. Many DIY builders use a small USB fan or a computer fan controlled by a thermometer to keep temps stable [2]. The importance of ventilation is often overlooked; inadequate airflow can cause your equipment to shut down unexpectedly or operate inefficiently. The tradeoff is between noise and heat: adding fans introduces noise, but without ventilation, your rig risks overheating, which can damage components or reduce lifespan. The implication is that a well-designed ventilation system—quiet, efficient, and properly positioned—is essential to maintain a balance between a silent environment and safe operation.
AudioSilk Acoustic Panels, 4 Pack ROOM KIT, Large, 46" x 23", Black
REDUCE NOISE: Struggling with poor acoustics in your recording/rehearsal space? AudioSilk panels give you professional, studio grade sound...
As an affiliate, we earn on qualifying purchases.
As an affiliate, we earn on qualifying purchases.
How to Seal Gaps and Make Your Closet a Noise Fortress
Gaps around the door, wall cracks, or vents are the sneaky leaks that undermine your effort. Sound escapes through tiny openings, making your closet more of a whisper chamber than a soundproof fortress.
Seal these with weatherstripping, acoustic sealant, or draft stoppers. For example, applying weatherstripping around the door frame can cut noise leakage by up to 70%. Covering gaps with moving blankets or foam panels helps dampen reflections too. The tradeoff is that improper sealing can lead to sound leaks or uneven absorption, which might cause echoes or bleed-through. Proper sealing ensures that your sound remains contained, preventing external noise from infiltrating and internal sound from escaping. The implication is that neglecting gaps can compromise the entire acoustic treatment, making your efforts less effective and possibly frustrating your recording quality.
One practical tip: use a door sweep or a heavy curtain over the door to block sound and reflections at the same time. This dual approach maximizes sound isolation while maintaining easy access to your rig.
Frequently Asked Questions
What is the difference between acoustic dampening and soundproofing?
Acoustic dampening reduces reflections and echoes within a room, making recordings clearer. Soundproofing blocks sound from leaking out or entering, often requiring heavy barriers and sealing. Both help, but they serve different purposes.
Where should I place acoustic panels in a closet booth?
Focus on the reflection points: behind the mic, the ceiling, and the corners. Use a mirror or flashlight to find these spots easily. Covering these areas with dense foam or panels reduces echo and improves vocal clarity.
Do I need to treat the door, and if so, how?
Yes. Gaps around the door let sound escape. Seal them with weatherstripping or acoustic sealant. Hanging blankets or foam over the door also helps dampen reflections and leakage.
How thick should panels or foam be for a small closet?
At least 2 inches thick is recommended for effective absorption in small rooms. Thicker panels absorb lower frequencies better, but 2-3 inches is usually enough for voice recordings.
Should I use blankets, foam, panels, or a mix?
A mix is best. Use foam or panels for reflection points and blankets or curtains for sealing gaps and covering doors. Combining materials gives more comprehensive sound control.
Conclusion
Transforming a closet into a quiet, professional-sounding booth isn’t magic—it's about thoughtful placement, effective dampening, and good ventilation. A little effort with sealing, absorption, and airflow makes a huge difference.
Remember, the best setup is one that balances sound quality with heat management and practical convenience. The next time your rig screams or echoes, think: where can I add a little more absorption, seal a tiny leak, or improve airflow? Small tweaks, big results.