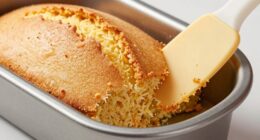
To avoid gummy sides in pan bread, wait until the crust has fully set and cooled slightly—about 10 to 15 minutes after baking—before unmolding. Check for a golden crust, a firm surface, and a hollow sound when tapped. Testing with a toothpick or gently pressing guarantees the bread is done. If you want more tips on perfect timing and techniques, keep exploring how to get that ideal crust and texture.
Key Takeaways
- Wait until the crust is golden and firm, typically 10–15 minutes after baking, before unmolding.
- Ensure the bread sounds hollow when tapped on the bottom to confirm doneness.
- Cool the bread in the pan until the crust is set and no longer sticky or gummy.
- Properly prepare and flour the pan to facilitate even baking and easy, clean release.
- Avoid unmolding too early; allow moisture to escape, reducing the risk of gummy edges and sides.
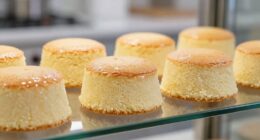
bread cooling rack
As an affiliate, we earn on qualifying purchases.
As an affiliate, we earn on qualifying purchases.
How to Tell When Your Bread Is Fully Baked

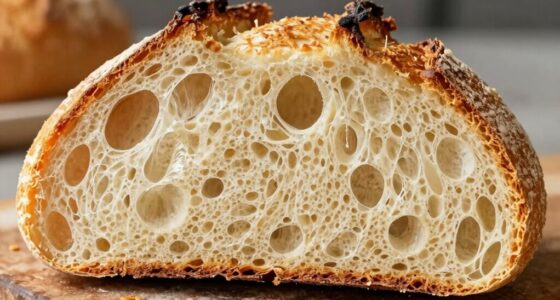
Determining when your pan bread is fully baked is essential to guarantee it’s perfectly cooked and ready to enjoy. First, check the oven temperature; verify it matches your recipe’s recommended setting, usually between 350°F and 375°F. An accurate oven temperature helps develop the right bread texture—crusty on the outside and soft inside. To test doneness, insert a toothpick or skewer into the center; if it comes out clean, your bread is likely baked through. You can also gently tap the top; a hollow sound indicates it’s ready. Additionally, the crust should be golden brown. Avoid removing it too early, as underbaking can result in gummy sides. Properly baked bread will have a firm crust and a tender, well-set interior. Contrast ratio also influences the appearance of the bread’s crust, making it look more appealing and well-baked.
non-stick bread pan
As an affiliate, we earn on qualifying purchases.
As an affiliate, we earn on qualifying purchases.
Why Cooling Time Matters Before Unmolding

Allowing your bread to cool slightly before unmolding helps it set properly. This gentle cooling prevents gummy edges and keeps the shape intact. Rushing the process can compromise the texture and appearance of your loaf. Moreover, proper cooling is essential for maintaining the ideal texture and appearance, ensuring your bread remains visually appealing and enjoyable to eat. Additionally, giving the bread time to cool allows excess moisture to evaporate, which can prevent gummy sides and improve overall crust quality.
Gentle Cooling Promotes Setting
Cooling your pan bread gently is essential because it allows the structure to set properly. During the cooling process, the starches and proteins in the bread firm up, which helps maintain its shape and texture. Rushing the cooling can interrupt the setting process, leading to a gummy or overly soft crust. Additionally, proper cooling techniques ensure that excess moisture escapes gradually, reducing the risk of sogginess. By giving the bread time to cool gradually, you guarantee that the internal structure solidifies without creating steam pockets or sogginess. This gentle cooling helps the bread develop a firm crust and a tender crumb, preventing it from collapsing or becoming sticky on the sides. Remember, patience during this stage is vital for achieving a well-formed, evenly textured loaf. Proper cooling ultimately assures your bread unmolds cleanly and maintains its ideal consistency. Effective cooling methods also help prevent the formation of condensation that can compromise texture and appearance. Using adequate cooling time allows the bread’s interior to fully set, which is why temperature regulation during cooling is crucial for optimal results. Incorporating mindful handling during this process can further enhance the bread’s final texture and appearance.
Prevents Gummy Edges
When you skip proper cooling time before unmolding, you risk ending up with gummy edges on your bread. Cooling allows excess moisture to escape, preventing that sticky, gummy texture around the crust. If you’re using ingredient substitutions, like alternative flours or sweeteners, give your bread extra time to set properly to avoid gummy edges. Proper storage tips also help maintain the right moisture balance, keeping the crust crisp and edges firm. Rushing to unmold can trap steam inside, making the sides soggy. Patience during cooling ensures the bread firms up, reducing the chance of a gummy exterior. Remember, waiting a bit longer before removing your loaf results in cleaner slices and a better texture, no matter what ingredients you’ve used.
bread oven thermometer
As an affiliate, we earn on qualifying purchases.
As an affiliate, we earn on qualifying purchases.
How to Test if Your Bread Is Done Without Damaging the Crust

To check if your bread is done without damaging the crust, you need to use a gentle, non-invasive method. One effective way is to tap the bread’s bottom; a hollow sound indicates it’s ready. You can also gently press the crust; it should feel firm but not too hard, showing good crust firmness. Observe the crumb texture; it should be uniform and slightly springy. To help, consider this quick reference:
| Test Method | What to Look For | Why It Works |
|---|---|---|
| Tap the bottom | Hollow sound | Indicates proper internal baking |
| Press the crust | Slightly firm but springy | Shows crust firmness is sufficient |
| Check the crumb | Consistent, springy texture | Confirms even baking |
bread testing skewer
As an affiliate, we earn on qualifying purchases.
As an affiliate, we earn on qualifying purchases.
When Is the Best Time to Unmold Your Bread?

The best time to unmold your bread is immediately after it has cooled enough to handle without risking damage. During the cooling period, the crust continues to form and harden, which helps the bread hold its shape. If you wait too long, the bread might stick to the pan or become difficult to remove, but removing it too early can cause the crust to tear or deform. Look for signs that the crust has set and firmed up; usually, this takes about 10 to 15 minutes after baking. By waiting until the crust has properly formed, you ensure a clean release and avoid gummy or sticky sides. Proper cooling techniques can also influence how easily your bread unmolds. Additionally, using the right pan materials can make a significant difference in how smoothly the bread releases. Understanding baking chemistry can help you anticipate the ideal timing for unmolding based on your specific recipe and conditions. Moreover, employing proper timing can prevent early mishaps and improve the overall appearance of your bread.
How to Remove Bread From the Pan Safely and Easily

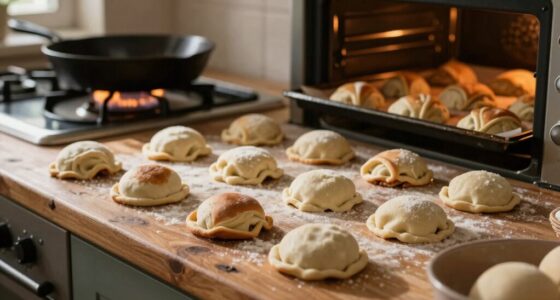
Once the crust has firmed up and the bread has cooled sufficiently, carefully preparing to remove it from the pan guarantees a smooth process. Lightly dust the pan’s sides and bottom with flour to prevent sticking. Use a silicone spatula to gently loosen the bread’s edges, working around the perimeter without tearing the crust. If your bread is still firmly adhered, let it cool a few more minutes; patience pays off. Once loosened, firmly grip the pan or invert it onto a cooling rack or plate. Gently tap or shake if needed, but avoid forcing it. Proper flour dusting and a gentle touch with the silicone spatula ensure you can remove your bread safely and easily, maintaining its shape and crust. Additionally, understanding free floating techniques can help prevent bread from sticking in the future.
Why Do Gummy Sides Happen Even When I Follow the Tips?

Even if you follow all the tips, gummy sides can still happen, often due to overmixing your batter or not baking long enough. Using the wrong pan or not preparing it properly can also trap moisture and cause stickiness. Additionally, improper mixing technique during preparation can incorporate excess moisture or develop gluten in a way that affects texture, so paying attention to your mixing method is essential for consistent results. Being aware of auditory processing challenges and how they influence sensory perceptions can also help you adjust your approach to achieve better baking outcomes. Incorporating AI-powered content creation tools can help you develop engaging storytelling for branding that makes your baking tips more memorable and appealing. Understanding these common pitfalls helps you troubleshoot and get better results, especially considering creative storytelling for branding approaches that can make your baking tips more engaging and memorable.
Overmixing Batter Consistency
Overmixing batter can lead to gummy sides because it develops the gluten in the flour too much, resulting in a dense, chewy texture. When you use improper mixing techniques, you activate gluten excessively, making the batter tougher and more elastic. This change in batter texture causes the bread to become gummy, especially around the edges. To prevent this, mix just until the ingredients are combined, avoiding overworking the batter. Gentle folding or stirring helps maintain a tender crumb and prevents gluten from over-developing. Pay attention to your mixing technique, and stop as soon as the batter is smooth and homogeneous. Keeping an eye on batter texture ensures your bread bakes evenly and avoids those undesirable gummy sides. Additionally, understanding the role of gluten development can help you better control the texture of your baked goods. Being aware of water content in your batter can also influence gluten formation and final texture.
Inadequate Baking Time
If your bread still develops gummy sides despite careful mixing, the issue might be underbaking. Insufficient baking time prevents the gluten development from fully setting the crumb, leaving moisture trapped inside. This extra moisture can cause the sides to stay gummy. To fix this, verify your oven temperature is accurate; an oven thermometer helps confirm you’re baking at the right heat. Baking too briefly means the crust hasn’t fully formed, which affects moisture escape. Check for doneness by tapping the bread’s bottom—if it sounds hollow, it’s likely done. Extending baking time slightly or increasing oven temperature can help fully cook the interior, reducing gummy sides and resulting in a well-structured, evenly baked loaf. Additionally, understanding baking times and temperatures can help prevent underbaking in future attempts. Ensuring consistent oven conditions and proper proofing techniques also contribute to achieving an evenly baked loaf. Being aware of oven calibration can further improve baking outcomes and avoid gummy textures. Properly managing heat distribution within your oven can also make a significant difference in baking results.
Incorrect Pan Preparation
Gummy sides can still occur despite following all the recommended tips if the pan isn’t prepared correctly. Proper pan preparation is vital to ensure your bread bakes evenly and releases easily. If your baking surface isn’t well-coated or if you use the wrong type of pan, the bread may stick or develop gummy edges. Avoid greasing the pan too heavily, which can trap moisture and cause stickiness. Using non-stick or well-floured surfaces helps prevent sticking and promotes even baking. Additionally, verify your pan is the right size; too small or too large can affect heat distribution, leading to gummy sides. Taking the time to prepare your baking surface properly is essential to achieving a clean, crisp crust free of gummy, chewy edges. Proper Gold IRA rollover procedures also involve careful handling to avoid penalties and ensure your investment is secure.
Frequently Asked Questions
Can Overproofing Cause Gummy Sides in Bread?
Yes, overproofing can cause gummy sides in bread. When you overproof, fermentation issues lead to excessive gas production, weakening gluten development. This results in bread that’s overly airy and dense, with a gummy, sticky texture on the sides. To avoid this, keep an eye on the dough’s rise, and don’t let it over-expand. Proper proofing guarantees better gluten structure and prevents that unwanted gummy residue.
Does the Type of Pan Affect the Likelihood of Gummy Sides?
Your choice of pan material and shape markedly influences whether your bread develops gummy sides. Non-stick or glass pans retain heat differently than metal ones, affecting moisture levels. A shallow, wide pan promotes even baking, reducing the risk of gummy edges, while tall, narrow pans trap steam and moisture, increasing that risk. So, select your pan wisely to guarantee a perfectly baked loaf without undesired gummy sides.
How Does Humidity Impact Bread’s Crust and Texture?
Humidity levels directly affect your bread’s crust and texture. High humidity keeps the crust softer and prevents it from becoming overly crispy, while low humidity promotes a crisp, golden crust. If the air is dry, your bread may develop a tough crust or Gummy sides. To achieve the perfect crust, control humidity by baking in a humid environment or using steam, ensuring your bread maintains the ideal balance between crust and interior softness.
Is There a Difference Between Bread Types Regarding Gummy Sides?
Think of bread types as different personalities—some are enthusiastic to showcase a golden crust, while others hide a softer, more delicate side. Regarding gummy sides, denser bread compositions like rye or whole wheat tend to develop a chewier, less crispy crust, making gummy edges more common. Lighter, airy breads like white or baguette varieties usually form a firm crust quickly, reducing the chance of gummy, undercooked edges.
Should I Adjust Baking Time for Different Oven Models?
Yes, you should adjust baking time based on your oven model. Check your oven calibration regularly to guarantee accurate baking temperature, as variations can affect how your bread turns out. If your oven runs hot or cold, extend or shorten the baking time accordingly. Monitoring your bread closely during baking helps prevent gummy sides and ensures even doneness, especially with different oven characteristics.
Conclusion
Remember, patience is your best ally in bread baking. Waiting for the right moment before unmolding guarantees your loaf isn’t gummy, much like a well-guarded secret from the days of old. Use the tips in this guide, and you’ll avoid that pesky sticky side. Keep a steady hand and a watchful eye—your bread will turn out perfect, and you’ll feel like a true artisan, even in this modern age.