
To prevent frosting from melting or sliding off, you should let your cake cool completely before applying any decorations. Usually, this takes about 1 to 2 hours after baking, depending on the cake size and thickness. Cool it on a wire rack for even airflow, and make sure it’s at room temperature before frosting. If you want to guarantee a flawless finish, there’s more to learn on how to perfect your cooling process.
Key Takeaways
- Cool the cake for 1 to 2 hours on a wire rack after baking.
- Ensure the cake is fully cooled to room temperature before frosting.
- Wrap loosely or cover with plastic once cooled to prevent drying.
- For delicate or crumbly cakes, chill in the freezer for 15-20 minutes before frosting.
- Avoid frosting a warm or hot cake to prevent melting or sliding of frosting.
Cooling your cake properly before frosting is essential to achieve a smooth, professional-looking finish. When you rush this step, your frosting can melt or slide off, ruining the appearance and texture. To prevent this, you need to know the right amount of time to let your cake cool and how to handle it during storage. Proper cake storage is key—if you leave your cake out for too long, it can dry out, but if you frost it too soon, the heat can cause the frosting to melt. Ideally, you want the cake to be at room temperature, which generally means waiting about 1 to 2 hours after baking, depending on the size and thickness of your layers.
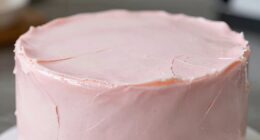
Allow your cake to cool completely for a smooth, professional finish before frosting.
Once your cake has cooled on a wire rack, you need to consider how to store it before frosting. Wrapping it loosely with plastic wrap or placing it in an airtight container helps preserve moisture and prevent it from drying out. But remember, the cake must be fully cooled before you do this; trapping residual heat inside can create condensation, leading to a soggy texture. If you’re short on time, placing the cake in the fridge for about 20-30 minutes can speed up cooling, but don’t leave it in there too long, or the cake might become overly cold and difficult to work with.
When you’re ready to frost, make sure the cake is at a comfortable temperature—neither warm nor cold. If it’s slightly chilled, you’ll find it easier to apply frosting smoothly without it melting or sliding. This is where frosting tips come into play. Using the right tips can help you achieve even coverage and decorative effects, but they work best when the cake is at the right temperature. If your cake is still warm, your frosting will become too runny, making it impossible to pipe clean lines or rosettes. Conversely, if the cake is too cold, the frosting might not spread evenly or adhere properly.
Another tip to keep in mind is to give your cake a brief freeze if you’re working with a particularly delicate or crumbly cake. A quick 15-20 minute freeze firms up the layers, making frosting application much easier. Just make sure the cake isn’t frozen solid, which can cause cracks or crumbs to break away. Ultimately, patience is your best friend here. Waiting for the cake to cool completely ensures that your frosting will set beautifully, resulting in a flawless finish that’s both visually appealing and delicious.
Frequently Asked Questions
Can I Frost a Warm Cake Without Melting the Frosting?
You can frost a warm cake without melting the frosting if you let the cake cool slightly first. Check that the cake’s surface feels only slightly warm or room temperature, ensuring the frosting’s consistency stays intact. For best results, store your cake properly, like wrapping it loosely or keeping it in a cool place, and follow cake storage tips to prevent melting or sliding. This way, your frosting remains smooth and beautiful.
How Do I Tell if the Cake Is Cooled Enough?
You can tell if your cake has cooled enough by gently touching the surface; it should feel just slightly warm or room temperature. Check the cake texture—if it’s firm and no longer shiny or sticky, it’s ready for frosting. Proper cooling guarantees good frosting adhesion and prevents melting. Remember, patience pays off, so give it enough time to cool completely for the best finish and a neat, professional look.
Does the Type of Frosting Affect Cooling Time?
Yes, the type of frosting affects cooling time because of frosting compatibility and temperature sensitivity. Buttercream and cream cheese frostings, for example, need the cake to be fully cooled to prevent melting or sliding. If your frosting is more delicate or sensitive to heat, you should wait longer for the cake to cool completely. Always check your frosting’s instructions to guarantee the perfect, smooth finish without melting.
Can I Speed up the Cooling Process Safely?
Think of cooling your cake as letting a fine wine breathe; rushing it can spoil the flavor. You can speed up the process safely with quick cooling methods like placing the cake in the refrigerator or using a fan. Just make certain you don’t expose it to extreme cold or humidity, as it can compromise frosting safety. Patience helps keep your cake perfect and delicious.
What Are Signs My Cake Is Too Cold to Frost?
You’ll know your cake is too cold to frost if the cake temperature feels icy to the touch or if the frosting doesn’t spread smoothly, tearing or slipping off. When you apply frosting, it may crack or slide off unevenly. Wait until your cake reaches a comfortable room temperature, around 70°F, to guarantee even frosting application and a smooth, professional finish. Patience now leads to better results later.
Conclusion
Once your cake has cooled to a gentle touch—like a whisper of cool breeze—you’re ready to frost. Imagine spreading smooth, silky icing over a perfectly chilled surface, each swipe gliding effortlessly. Waiting just enough prevents melting mishaps, keeping your cake looking picture-perfect and tasting divine. So, give it that little extra time, and enjoy the satisfying sight of a beautifully frosted cake, ready to impress with every bite. Patience truly makes the sweet reward even sweeter.