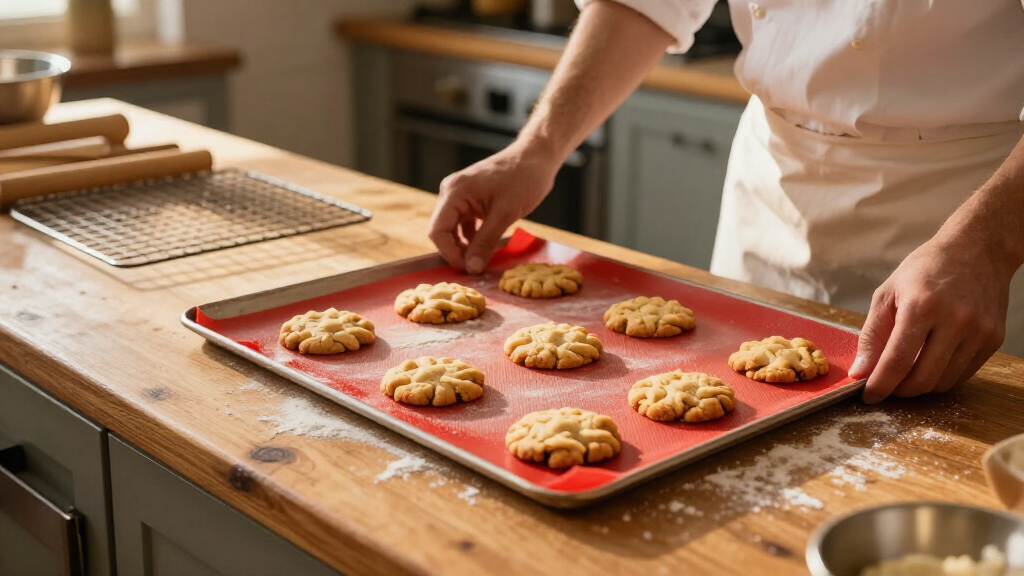
Use a silicone baking mat to line a compatible baking sheet, bake food on its surface, and clean and store it for reuse. This guide is for home bakers using a reusable mat for the first time or looking to avoid sticking, uneven browning, and lingering odors. The task is beginner-friendly and takes about 5-10 minutes of hands-on preparation and cleanup, in addition to the recipe’s baking time.

Get baking supplies delivered free with Prime
- Fast, free delivery on millions of items
- Prime Video, Amazon Music and more included
- Member-only deals all year

Ourokhome Silicone Baking Mat with Bench Scraper, 20" x 16" Non-Stick Rolling Mat, BPA-Free, Dishwasher Safe (Beige)
- ✔ Brand: Ourokhome
- ✔ Material: Food-grade platinum silicone; BPA-free
- ✔ Size: 20 x 16 inches

AMYONE Square Silicone Baking Mats for 10 Inch Cake Pan (2-Pack), 9.65" Non-Stick Reusable Mat for Baking Sheet, Air Fryer, and O…
- ✔ Brand: AMYONE
- ✔ Material: Food-grade silicone with fiberglass
- ✔ Size: 9.65-inch square; for 10-inch pans

AMYONE Silicone Baking Mat for Full Size Sheet Pan, Platinum, Large
- ✔ Brand: AMYONE
- ✔ Material: European food-grade liquid silicone with reinforced fiberglass mesh
- ✔ Size: 24.5 x 16.5 inches
Difficulty: Beginner | Time: 5-10 minutes of setup and cleanup, plus baking time
What You’ll Need
Tools & Materials:
- Silicone baking mat
- Compatible rimmed baking sheet
- Dish soap and a soft sponge or cloth
- A clean towel or drying rack
Knowledge:
- Basic oven use
- How to read a recipe’s temperature and baking-time instructions
Check the mat’s packaging or manufacturer instructions for its temperature limit, oven-use guidance, and cleaning restrictions. Mats vary. Use one only within its stated limits, and do not assume it is safe under a broiler, on a stovetop, or in direct contact with an oven heating element.
Ourokhome Silicone Baking Mat with Bench Scraper, 20" x 16" Non-Stick Rolling Mat, BPA-Free, Dishwasher Safe (Beige)
The Ourokhome is the most capable choice when “baking mat” means a protected, organized place to roll dough. Its 20-by-16-inch surface is larger than the AMYONE square inserts and offers more room for shaping pastry, while printed measurements, concentric circles, and conversion tables make sizing easier to repeat. Raised edges help contain loose flour and small scraps, and the electrostatic backing is designed to keep the mat in place as we work.That countertop focus is also its limitation. Unlike the two AMYONE options, this is not described as a pan liner with a specified oven temperature range, so we would choose it for pastry work rather than assume it is a direct substitute for a sheet-pan liner. The included stainless steel bench scraper adds practical value for dividing or lifting dough, although it is a basic accessory. At 15.2 ounces, it can be rolled or folded for storage; the beige surface may show staining with repeated use. Compared with the AMYONE set, it is better equipped for rolling and measuring, but less clearly suited to oven baking inside a pan.
Pros:
- Non-stick surface is described as suitable for wet, hydrated doughs.
- Non-slip backing and raised edges help keep the work area steadier and tidier.
- Printed measurements, concentric circles, and conversion tables support repeatable shaping.
- Includes a stainless steel bench scraper and a lockable storage strap.
Cons:
- No oven temperature range is included in the supplied specifications.
- The beige color may show stains over time.
- The included scraper is a basic design.
Best for: Home bakers who roll pastry or hydrated dough on the counter and want printed guides, grip, and a scraper in one set.
Not ideal for: Bakers mainly looking for a heat-rated pan liner for cookies, roasting, or an air fryer.
Bottom line: Choose the Ourokhome when countertop dough work matters more than fitting a baking pan.
“Choose the Ourokhome when countertop dough work matters more than fitting a baking pan.”
AMYONE Square Silicone Baking Mats for 10 Inch Cake Pan (2-Pack), 9.65" Non-Stick Reusable Mat for Baking Sheet, Air Fryer, and O…
For small-format baking, the AMYONE two-pack solves a different problem from the Ourokhome: it puts two reusable liners into compatible pans instead of creating a large countertop work area. Each mat measures 9.65 inches square and is intended for 10-inch cake pans, springform pans, baking sheets, and air fryers. The pair lets us line more than one small pan or keep a spare ready, while the stated range of -40°F to 480°F covers the listed oven, microwave, and air fryer uses.Its advantage depends on accurate measuring. The square shape is less flexible than a broad rectangular mat, and the 9.65-inch footprint will not cover larger cookware. The product description also notes that coating thickness may vary from premium brands, so buyers prioritizing a heavier-feeling liner may prefer to compare construction carefully. Against the full-size AMYONE, this set trades coverage for compact appliance compatibility; against the Ourokhome, it offers a stated oven range but lacks the printed dough guides and scraper. It is the practical pick for small pans, not a universal substitute for parchment across every tray.
Pros:
- Two mats provide liners for multiple compatible small pans.
- The 9.65-inch square format suits specified 10-inch pans and some air fryers.
- Listed temperature range is -40°F to 480°F for oven, microwave, and air fryer use.
- Dishwasher safe, with warm soapy water also listed for cleanup.
Cons:
- Square dimensions limit compatibility with larger or differently shaped pans.
- The supplied description says silicone coating thickness may vary from premium brands.
- No thickness measurement is provided.
Best for: People who regularly bake in 10-inch square pans or use a compatible air fryer and want two reusable inserts.
Not ideal for: Anyone who needs a countertop pastry mat or a liner that covers a standard large rectangular sheet pan.
Bottom line: Pick this two-pack when compact pan fit matters more than broad coverage or dough-prep features.
“Pick this two-pack when compact pan fit matters more than broad coverage or dough-prep features.”
AMYONE Silicone Baking Mat for Full Size Sheet Pan, Platinum, Large
The full-size AMYONE is the straightforward choice when the baking surface itself is the priority. At 24.5 by 16.5 inches, it is designed to span a full-size sheet pan, offering more coverage than the square AMYONE pair. Its fiberglass mesh reinforcement and 0.75 mm thickness give buyers concrete construction details, and the listed -40°F to 480°F range supports the oven tasks named in the product description, from cookies and bread to roasting vegetables.That coverage comes with a fit check: the mat may be too large for common home half-sheet pans, so measuring the pan’s interior before buying is essential. Compared with the compact two-pack, this is better for a large rectangular tray but less adaptable to small appliances. It also lacks the Ourokhome’s countertop guides and scraper, because its role is lining a baking sheet rather than shaping dough. The orange color is easy to spot in a drawer, while the care instructions call for a boiling-water wash before first use. Buyers with only standard home trays should verify dimensions rather than assume “sheet pan” means a universal fit.
Pros:
- Large 24.5-by-16.5-inch format covers a full-size sheet pan.
- Fiberglass mesh reinforcement and stated 0.75 mm thickness clarify its construction.
- Listed temperature range is -40°F to 480°F.
- Dishwasher safe and reusable as an alternative to parchment.
Cons:
- May not fit standard home half-sheet pans; pan dimensions need checking.
- Requires a boiling-water wash before first use, according to the description.
- One mat is included, unlike the compact AMYONE two-pack.
Best for: Bakers who own a full-size sheet pan and want a reusable liner for broad oven coverage.
Not ideal for: Households whose largest tray is a standard half-sheet pan or who need a mat for rolling dough.
Bottom line: Choose this AMYONE for full-size tray coverage after confirming your pan dimensions.
“Choose this AMYONE for full-size tray coverage after confirming your pan dimensions.”
As an Amazon Associate we earn from qualifying purchases.
Before You Start
Inspect the mat for cuts, deep scratches, or damaged areas. Replace it if it is torn or deteriorating. Confirm that it lies flat inside the baking sheet and does not hang over the edges. A silicone mat is a liner, not a baking sheet: it needs a firm, rimmed pan underneath for support when you carry it. Follow your recipe and the mat maker’s instructions if they differ from general guidance.
Step-by-Step Instructions
Step 1: Wash and dry the mat
Wash a new or stored mat with warm water and dish soap. Gently wipe both sides with a soft sponge or cloth, rinse away all soap, and dry it fully. Avoid abrasive pads and sharp tools, which can scratch or cut the surface.
Tip: If the mat has a strong factory or storage odor, wash it and let it air-dry before baking.
Check: The mat feels clean and dry, with no visible crumbs, grease, or soap residue.
Step 2: Match the mat to the pan and oven
Set the mat flat on a baking sheet that fits its size. Check the mat’s stated maximum temperature against your recipe’s oven temperature. Remove the mat from the oven setup if the recipe calls for broiling or if the mat’s instructions prohibit the planned use.
Tip: Do not fold, trim, or force an oversized mat into a smaller pan. A poor fit can curl or leave the mat unsupported.
Check: The mat lies flat, fits within the pan’s rim, and is rated for the planned oven temperature.
Step 3: Prepare the recipe and mat
Preheat the oven as the recipe directs. Place food directly on the clean mat, leaving the spacing the recipe calls for. Do not grease the mat unless the recipe or mat maker specifically directs you to do so; extra oil can make some baked goods spread more than expected.
Tip: For cookies, use the same portion size and spacing you would use on parchment or a bare pan. A mat can change how the bottom browns, so check the first batch as it bakes.
Check: Food is arranged evenly on the mat, with room for heat to circulate around the pieces.
Step 4: Bake within the stated limits
Lift the baking sheet by its edges and place it on the oven rack. Bake according to the recipe, checking near the suggested finish time. Keep the mat away from exposed heating elements, open flames, and broiler heat. Use oven mitts to remove the pan; the mat and pan will both be hot.
Tip: Avoid pulling or sliding the mat while it is hot. Let the supported pan carry the weight of the food.
Check: The food is baked to the recipe’s visual or temperature cues, and the mat has not shifted onto an oven element.
Step 5: Cool the food before lifting it
Set the baking sheet on a heat-safe surface. Let cookies or other delicate items rest for the time specified by the recipe before lifting them with a spatula. Do not bend the hot mat to release food; this can spill grease or hot crumbs and may stress the mat.
Tip: If food sticks, give it more time to cool before working a thin spatula beneath it.
Check: Food lifts without tearing, and the mat remains flat and supported.
Step 6: Wash the mat after baking
Let the mat cool completely, then remove crumbs and grease. Wash it with warm water and dish soap, wiping both sides with a soft sponge. Rinse thoroughly and dry it completely before putting it away. Check the manufacturer’s instructions before using a dishwasher.
Tip: For greasy residue, wash the surface promptly and repeat with fresh soapy water if needed. Do not scrape it with a knife or scour it with an abrasive cleaner.
Check: The surface has no visible food or oily film and is fully dry.
Step 7: Store it flat or loosely rolled
Store the dry mat flat in a drawer or loosely rolled in a clean, dry place. Keep it away from sharp utensils, rough edges, and direct heat. Avoid tight folds or creases, which can make it sit unevenly on a pan.
Tip: If you stack pans, do not trap the mat where it can be cut or pinched by a sharp rim.
Check: The mat is clean, dry, uncut, and ready to lie flat for its next use.
Common Mistakes to Avoid
- Using the mat above its temperature rating or under a broiler. — Check the product instructions before each unfamiliar cooking method, and keep the mat away from direct flame and heating elements.
- Putting the flexible mat directly on an oven rack without a pan. — Place it on a firm baking sheet so the mat and food stay supported during loading and removal.
- Greasing the mat automatically. — Start with a clean, dry mat and add grease only when the recipe or manufacturer calls for it.
- Cutting, folding tightly, or scrubbing the mat with rough tools. — Use soft cleaning tools and store the mat flat or loosely rolled to protect its surface.
Troubleshooting
Problem: Cookies or other food stick to the mat.
Solution: Let the food cool for a few minutes, then loosen it gently with a thin spatula. If sticking continues, check that the mat is clean and undamaged, and follow the recipe’s release and cooling instructions.
Problem: The bottoms brown less than expected.
Solution: Check the food near the recipe’s suggested finish time and allow extra baking time only as needed. Silicone can affect browning compared with a bare metal pan; use the recipe’s doneness cues rather than relying on color alone.
Problem: The mat feels greasy after washing.
Solution: Wash it again with warm water and dish soap, using a clean soft sponge and fresh soapy water. Rinse well and air-dry. Avoid abrasive cleaners that could damage the surface.
Problem: The mat curls or shifts during baking.
Solution: Let it cool, then check that it is the right size for the baking sheet and lies flat. Replace a permanently warped or damaged mat, and keep it supported on the pan when moving it.
What Success Looks Like
The food is baked to the recipe’s doneness cues, the mat stayed flat on a compatible baking sheet and within its stated temperature limit, and the food released without damage after cooling. Afterward, the mat is clean, free of oily residue, fully dry, and stored flat or loosely rolled without cuts or tight creases.
Next Steps
Use the mat again only after checking that it is clean, dry, and undamaged. Follow the maker’s cleaning and temperature instructions each time, and replace the mat if it tears, becomes persistently sticky despite cleaning, or no longer lies flat. If a recipe gives different directions for a lined pan, follow those directions for that batch.
Frequently Asked Questions
Do I need to grease a silicone baking mat?
Usually, no. Start with a clean, dry mat and grease it only if the recipe or manufacturer specifically directs you to. Adding oil unnecessarily can affect how some foods spread.
Can I put a silicone baking mat directly on the oven rack?
Use the mat on a firm baking sheet unless its instructions explicitly say otherwise. The pan supports the flexible mat and makes it safer to carry.
Can I cut a silicone baking mat to fit my pan?
No. Cutting can damage the surface and compromise the mat. Choose a size that fits your baking sheet instead.
Can I use the mat under a broiler?
Do not use it under a broiler unless its manufacturer explicitly approves that use. Broilers expose food and cookware to intense direct heat.
How should I store a silicone baking mat?
Wash and dry it fully, then store it flat or loosely rolled in a clean, dry place. Keep it away from sharp objects and avoid tight folds.
Fall Picks
fall essentials
As an affiliate, we earn on qualifying purchases.